Back to TheWorxHub for Senior Living Main Menu
Resident Moves
Watch the Video Tutorial:

Changing Rooms
- Click on the Search tab, then select the Locations/Residents tab.
Identify Unoccupied Rooms
First you will need to see which rooms are unoccupied to be able to identify which room you would like to move the resident to.
- To see all unoccupied rooms, select Unoccupied only from the Occupied drop down menu, and click Search Now.
- Look at the list of unoccupied rooms and identify which will be the resident's new room.
- Click Clear Search to remove any search filters.
Assigning the Resident to an Unoccupied Room
Next you will need to assign the resident to the unoccupied room you just found.
- Type and select either the resident's name or their current location name in the Location/Resident field, then click Search Now.
- Click on the resident's name in the Resident column of the search results.
- Scroll down and click on Move History to open that panel.
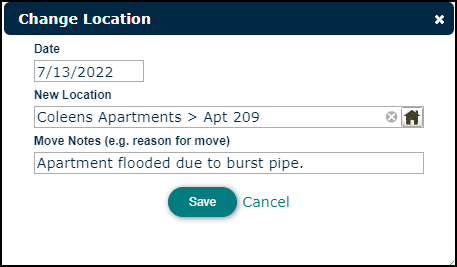
- Click the Change Location button.
- Select the Date of the move from the calendar.
- Type and select the New Location where the resident will be living or click on the location picker (
 ) to choose the location. As you are browsing the location picker, note that any occupied residential rooms will show with a plus sign next to the room. To see who currently lives there, click on the plus sign to expand the location tree.
- Enter any applicable Move Notes, then click Save.
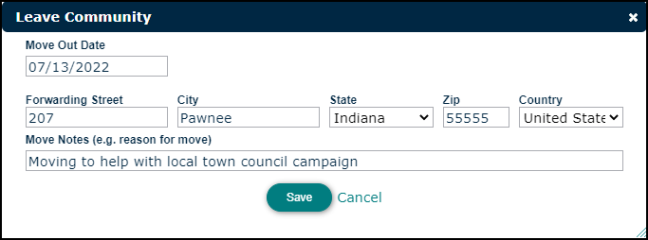
Leaving the Community
- Click on the Search tab, then select the Locations/Residents tab.
- Type and select either the resident's name or their current location name in the Location/Resident field, then click Search Now.
- Click on the resident's name in the Resident column of the search results.
- Scroll down and click on Move History to open that panel.
- Click on the Leave Community button.
- Select a Move Out Date from the calendar.
- Enter the forwarding address information.
- Type any applicable Move Notes, then click Save.